In this blog, we’ll explore how to customize three key interface areas within BricsCAD: the menus, toolbars, and ribbon.
Customizing Menu Items
The menu bar at the top of the screen comprises various items, including the context menus, which become active when you right-click within the drawing area. Here’s a simple way to modify these menus:
- Use the customize command or click the Customize Ribbon button in the interface settings dialog.
- Switch to the Menus tab, which contains the main and context-sensitive menu.
- You can add a menu item by clicking on the plus sign located next to that item.
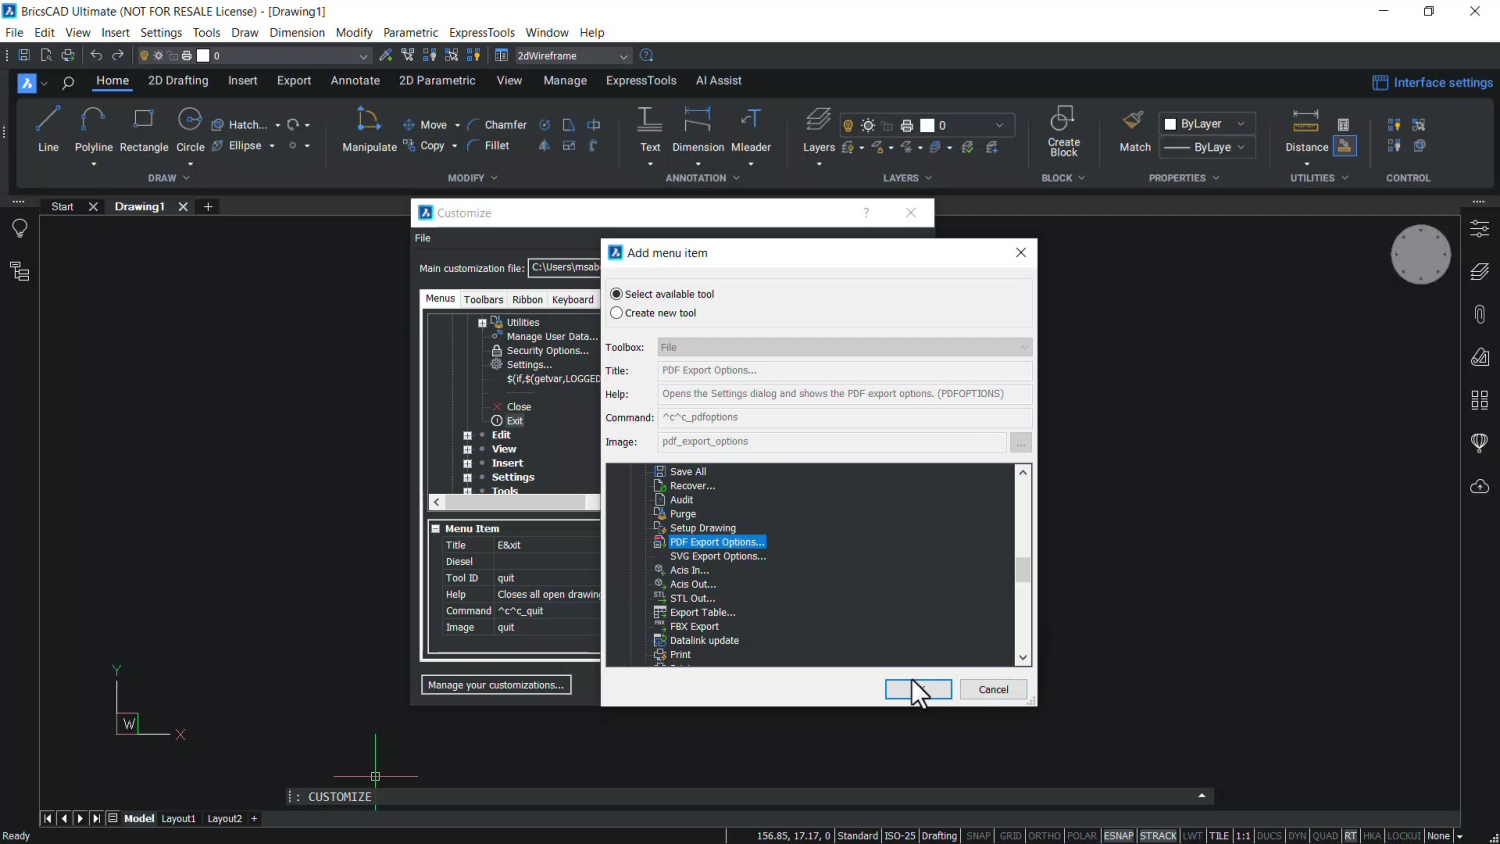
- You can insert your desired item by right-clicking and selecting Insert item, which opens the Add menu item dialog box.
- Expand the plus sign next to the file menu and select your preferred option—for example, PDF export.
- After adding the item, click on OK. This reflects in the file menu with the newly added ‘PDF export’ option.
To remove an item from the menu, follow the same process, but instead of adding, select the ‘PDF export’ option, right-click, and ‘delete’.
Customizing Toolbars
The toolbar is just below the menu bar, whose size can be altered by right-clicking on it, choosing ‘toolbar size,’ and then ‘large icons.’
You may add or remove tools from the toolbar through the customized dialog. Navigate to the Toolbars tab listing the existing toolbar items. To create a new toolbar:
- Right-click on ‘BricsCAD’ and select Append toolbar.
- Give your new toolbar a title; say My Toolbar.
- Drag numerous items from the right panel to the toolbar. For example, you can expand 2D constraints and drag the coinciding constraint to the toolbar. Similarly, include colinear and concentric constraints and click on OK.
You should now see My Toolbar in the workspace.
Customizing the Ribbon
The ribbon in BricsCAD consists of a ribbon tab on top, ribbon panels, command buttons, and flyouts. To modify the ribbon, start by clicking on the ‘ribbon tab’ in the customized dialog.
To append a new ribbon tab, right-click on Ribbon tabs. As you look under the ribbon tabs, you’ll notice several items, each corresponding to ribbon tabs. You can add a panel to a tab as follows:
- Right-click on the tab name and select Append panel.
- Expand the plus sign corresponding to a panel to view the panel names.
- Select a panel (for example, draw panel), right-click, and click on Show panel. This brings up all the command buttons in the panel.
- To include a new command button, select a command, right-click, and select Insert command button.
- Expand Draw opt for Fit polyline and confirm by clicking on OK.
You can now view the newly added command button for ‘fit poly line’ in the draw panel.
If you wish to revert to the default workspace at any moment, go to the customize dialog, click on Manage your customization, and select Revert to default. Confirm by clicking OK.
Customizing your toolbars, menus, and ribbon is a great way to improve efficiency and tailor BricsCAD to fit your workflow. With these simple steps, you’ll have a personalized workspace in no time.
Want more BricsCAD® Tips?
If you want more BricsCAD Tips, check out our YouTube channel or take a peek at the rest of the our Blogs
Have you used BricsCAD® and have some ideas or suggestions?
Fantastic! We love hearing your thoughts on BricsCAD® – all feedback is welcome, whether good or bad. The best way to tell us what you think about BricsCAD is to send us a support request; our support team will gladly help.
Get started with BricsCAD® today!
Download the 30-day free trial now and discover how you can accelerate your time to deliverable with BricsCAD.


